If you are the owner, administrator, or manager of your company's OneTapConnect account, you can manage nearly every aspect of your account from your account dashboard.
Log in to your OneTapConnect account dashboard to get started, then use the resource guide below for more information on each section of your dashboard.
For more information on how to log in to your account dashboard, see How to log in to your account dashboard.
Analytics
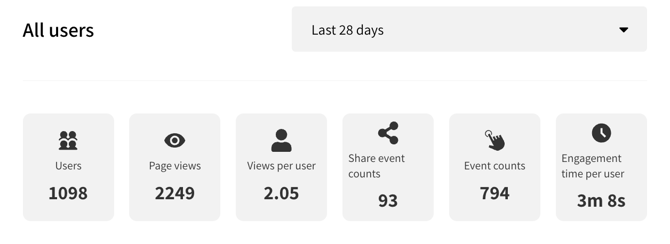
The Analytics page provides an essential snapshot of others' interactions with your identity profiles, giving you an objective method to measure your identity profiles' performance. To save a copy of your analytics, expand the Action menu, then click Export analytics.
For more information on what identity profile activity is tracked, see Understanding your OneTapConnect analytics.
Users
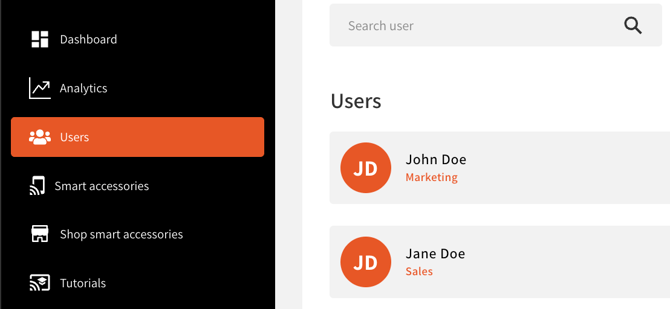
Actions you can take from the Users page:
- Add or deactivate users/identity profiles
- Update user profile/identity profile information
- Organize your users/identity profiles into Teams to assign Template designs.
Smart accessories

The Smart Accessories page lists all of the near-field communication (NFC) Smart Accessories currently associated with your company's OneTapConnect account.
So long as a user has an active status on the Users page, that user can:
- Download and log in to the OneTapConnect mobile app
- Activate their own NFC Smart Accessories using the OneTapConnect mobile app
- Watch the OneTapConnect Basics training video on the homepage of the mobile app
- Get started using their new OneTapConnect identity profile immediately!
After your users have activated their own Smart Accessories, you'll be able to see who is assigned to which physical items on the Smart Accessories page of your account dashboard. This will enable you to deactivate or reassign Smart Accessories as needed.
For more information on using NFC Smart Accessories, see How to use OneTapConnect Smart Accessories.
Company Information
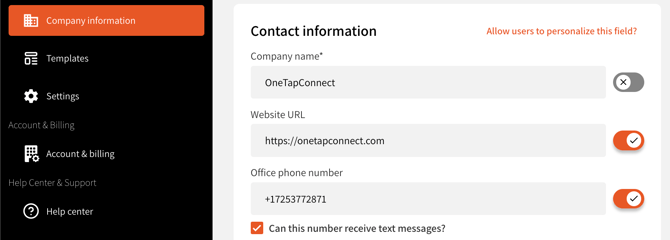
The Company Information page is where you can manage general information about your company, such as your company's website URL, office phone number, company logo, and social media links.
Everything that is saved to your account's Company Information page is considered the default information for every identity profile on your account, but you can make exceptions by unlocking specific fields for personalization as needed.
If you update a field on the Company Information page and then click Save, the system will update every instance of that value on every identity profile on your account that does not have a personalized value for that field.
For more information on personalizing identity profiles, see How to personalize company information on a identity profile-by-identity profile basis.
Templates
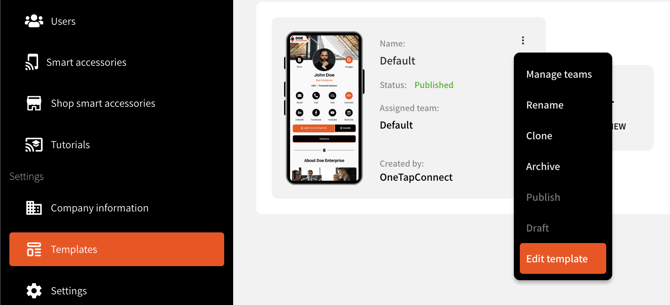
The Templates page is where you can view, assign, and manage all of the Templates that exist on your account.
Templates are design files that contain most of the graphic information for your company's identity profiles. Templates pull information directly from your account's Company Information page, and then personalize that information using user/identity profile information.
What is the relationship between Teams and Templates?
- Users/identity profiles are organized into Teams.
- Teams are assigned to Templates.
- Templates determine the designs that are assigned to your Teams' identity profiles.
How to update a Template using the Visual Editor:
- Go to Templates.
- Click ⋮ on the Template you need to update, then click Edit Template to open the Visual Editor for that Template.
For more information on updating your identity profile designs, see How to update your identity profile(s) design.
Settings
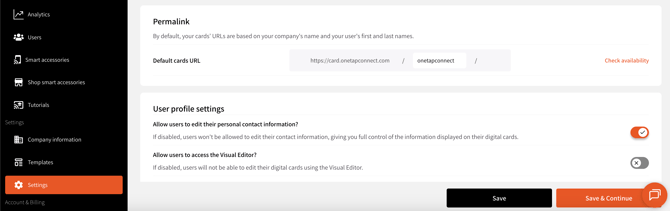
The Settings page is where you can manage some basic settings and configurations, including:
- The company name URL value for the identity profiles on your company's account
- Users' basic permission settings
- Under default account settings, the only thing a user without administrator or manager access levels can update is their own identity profile contact information (and any identity profile company information fields you have unlocked for personalization).
This and other permissions can be managed in the User Profile Settings section of the Settings page.
For more information on user roles and access levels, see How to manage your users' access levels.
- Under default account settings, the only thing a user without administrator or manager access levels can update is their own identity profile contact information (and any identity profile company information fields you have unlocked for personalization).
- The prewritten messages that are autopopulated by the Share button on a case-by-case basis
- For more information on how the Share button behaves differently depending on how it's accessed, see How to use the share button.
Account & Billing
The Account & Billing page is where you can:
- Manage your OneTapConnect subscription.
- Manage the number of identity profile licenses on your account.
- Update your billing information.
- View order details and invoices.
- Manage your users' access levels.
Access to the Account & Billing page is limited to account owners (SuperAdmins) and administrators of OneTapConnect Team Plan accounts. Managers and other users without assigned access roles cannot view or modify anything related to account, subscription, or billing information.